Migrate SoftActivity database from PostgreSQL 9.6 to 18: Admin Guide
The current SoftActivity Monitor and TS Monitor releases, starting with SoftActivity version 15, come bundled with the on-premises PostgreSQL 18 x64 database server, which offers improved performance, security, and reliability. SoftActivity version 14 bundled PostgreSQL 15. Earlier SoftActivity versions used PostgreSQL 9.6.
If you are installing SoftActivity Monitor or TS Monitor version 15 or later as a fresh installation, PostgreSQL 18 is installed by default. No additional action is needed. If you are already running SoftActivity version 14 with PostgreSQL 15, updating the product to SoftActivity version 15 upgrades PostgreSQL 15 to 18 automatically and this guide is usually not needed.
PostgreSQL 9.6 should no longer be used. This guide is mainly for older installations that still use PostgreSQL 9.6. For data integrity, a direct major upgrade from PostgreSQL 9.6 to 18 is not performed automatically. The current Webapp included with SoftActivity version 15 is not installed on PostgreSQL 9.6, and older Webapp builds running on PostgreSQL 9.6 are no longer supported. Current installers use PostgreSQL 18 as the bundled database engine.
To switch from PostgreSQL 9.6 to the current bundled database platform, you must perform a complete uninstall of SoftActivity and a fresh installation of SoftActivity version 15 or later. The database from the previous version can then be transferred to the new database server. It is not mandatory to migrate old data; you can choose a complete reinstall and start with a fresh PostgreSQL 18 database.
You have 2 options for this upgrade:
1. Simplest and recommended option: completely reinstall SoftActivity and start with a new database
- Old logs and existing Web Console accounts will be removed and will not be accessible.
- Save the Agents list in SoftActivity Monitor:
- To preserve the list of monitored computers and their settings, export the list and later restore it into the new version.
- Open SoftActivity Monitor, click
File, click the two arrows at the bottom, then selectExport Agents List. - Select a destination folder, such as
Documents, and enter a file name, for exampleagents.xml. - Click
Save. You will be prompted to save passwords into the file. You can select this option, but ensure the file does not leave your computer.
- Launch the uninstall of SoftActivity Monitor or TS Monitor from
Apps & Featuresin Windows Settings. In TS Monitor, you can find the uninstall button on theAbouttab. - Select the
Remove Data Foldercheck box, if available, to ensure that old data has been deleted, as it cannot be used anymore. - Ensure that the SoftActivity data folder has been deleted, or delete it manually. By default, the data folder is
C:\ProgramData\Salog\data\. - Download the latest licensed version of SoftActivity software from the update center.
- Run the installation and complete it. Enter your registration key to activate.
- Restore the Agents list in SoftActivity Monitor. Select
File -> Import Agents list, and select theagents.xmlfile saved earlier. - Verify that all computers come online in the list.
- Open the Web Console in a browser, log in, and change the password for your account.
2. Reinstall and preserve existing logs
This option requires more administrative work, but it preserves your existing logs and Web Console accounts.
Continue with all the steps below.
How to determine which PostgreSQL version is installed by SoftActivity
PostgreSQL 18
- Windows service is still called
SapgSrv15 - Installed in
C:\Program Files\SoftActivity\Activity Monitor\postgres18 - Data directory is
pgdata18 - SoftActivity product version 15 or later comes with PostgreSQL 18
PostgreSQL 15
- Windows service is called
SapgSrv15 - Installed in
C:\Program Files\SoftActivity\Activity Monitor\postgres15 - Data directory is
pgdata15 - SoftActivity product version 14 bundled PostgreSQL 15
- Updating SoftActivity from version 14 to version 15 upgrades PostgreSQL 15 to 18 automatically
PostgreSQL 9.6
- Windows service is called
SapgSrv - Installed in
C:\Program Files\SoftActivity\Activity Monitor\postgres - Data directory is
pgdata - SoftActivity product version 13 or earlier comes with PostgreSQL 9.6
Create dump from PostgreSQL 9.6 database
This step should be completed before uninstalling the older PostgreSQL 9.6-based installation.
To create a data dump from your old database using pg_dump from PostgreSQL 9.6, follow the instructions below.
- Create a folder for the dump file. The
backupfolder on driveC:is used in this example. - Open Command Prompt.
- Change the current directory to the
postgres\binfolder by typing the following command. For TS Monitor, replaceActivity MonitorwithTS Monitor.
cd "%ProgramFiles%\SoftActivity\Activity Monitor\postgres\bin"
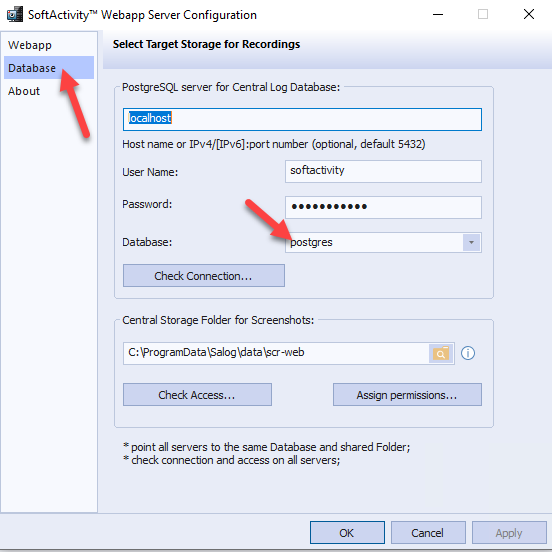
- Important: determine the current database name in use. Open
Options -> Databasetab ->Database Configuration, and note the name selected in theDatabasedrop-down list. In the example below, the name ispostgres, which is the default. We will usepostgresin the next step after the-dcommand line parameter.
- Create a dump file from the existing database:
pg_dump --file="C:\backup\softactivity.dump" --format=c -d postgres -h localhost -U softactivity
In this command:
-d postgresspecifies your database name. It can be seen in the database settings window, determined in the previous step. By default, it ispostgres.-U softactivityrefers to the user name used to connect to the PostgreSQL database. By default, this issoftactivity.--filedetermines the location where the dump file will be stored. Ensure that the specified folder has been created in advance.
You will be prompted to enter your PostgreSQL database password. This is the password initially set during the SoftActivity installation.
Upon successful execution of this command, you will find a softactivity.dump file in the C:\backup directory. Ensure that the file size is larger than 0; otherwise, the dump was not created successfully.
Save the Agents list
To preserve the list of computers and their settings, export the list and later restore it into the new version.
- Open SoftActivity Monitor, click
File, click the two arrows at the bottom, then selectExport Agents List. - Select a folder, such as
Documents, and enter a file name, for exampleagents.xml. - Click
Save. You will be prompted to save passwords into the file. You can select this option, but ensure the file does not leave your computer.
Upgrade to the latest SoftActivity with PostgreSQL 18
Find your registration name and key, then download the latest licensed or full version from the update center.
Uninstall the older version
Launch the uninstall of SoftActivity Monitor or TS Monitor from Apps & Features in Windows Settings. In TS Monitor, you can find the uninstall button on the About tab.
Do not select the Remove Data Folder check box, to ensure that existing screenshot images are preserved.
The uninstall action will also remove PostgreSQL 9.6.
As an optional step, you can delete the old database directory along with all its files, because the new version will not use it. To do so, remove the pgdata directory found inside the SoftActivity data folder. By default, this is located at C:\ProgramData\Salog\data\. Ensure that you do not delete the scr-web directory, which contains screenshots.
A computer restart may be required to complete the uninstall process. If so, reboot the computer or server.
Install the latest SoftActivity software version 15 or later
Proceed to install SoftActivity Monitor version 15 or the latest licensed version. Do not install the free demo. During installation, ensure that you select the bundled PostgreSQL 18 database component.
Select the same Data folder as in the previous version, so the new installation can access existing screenshots. If you did not change the default C:\ProgramData\Salog\data, you do not need to change anything.
Do not activate it yet by entering a registration key, so that the application and services do not start until the database migration is complete. Activation will be completed later.
Restore database dump into PostgreSQL 18
To restore your dump file into a new database using pg_restore from PostgreSQL 18, follow the steps below:
- Open Command Prompt.
- Change the current directory to the
postgres18\binfolder by executing the following command:
cd "%ProgramFiles%\SoftActivity\Activity Monitor\postgres18\bin"
- Create a new database by executing the command:
createdb -U softactivity -h localhost softactivity1
In this command, softactivity1 is the new empty database name. You can choose any name for the new database.
-U softactivity specifies the user name used to connect to the database, where softactivity is the default user.
If prompted, enter the PostgreSQL password that was set during the previous installation step.
Now restore the previously created dump file into the new database by running the following command:
pg_restore -d softactivity1 -h localhost -U softactivity --jobs=8 "C:\backup\softactivity.dump"
In this command, softactivity1 is the name of your new database.
-U softactivity specifies the user name used to connect to the database.
Enter the PostgreSQL password used during the installation stage in the previous step.
Note: "schema public already exists" is expected and can be ignored. It does not affect the restore process.
Activate the app with new database and check the results
Now that the data has been restored into the softactivity1 database, activate SoftActivity software and switch it to this new database.
- Open the SoftActivity Monitor console app, or the TS Monitor config app. It should ask you to activate it, because this is a fresh install. Copy the registration key you prepared earlier.
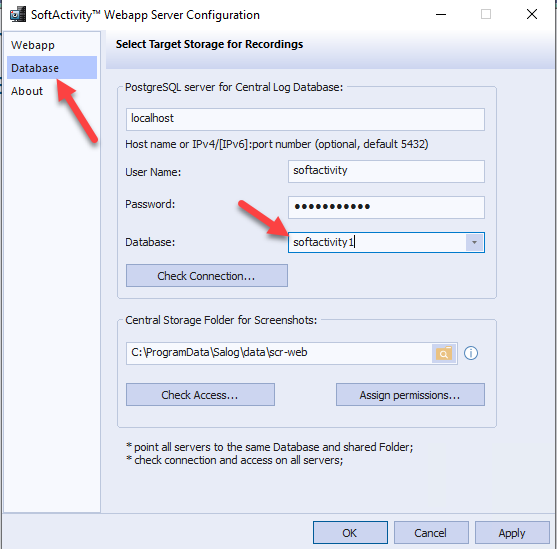
- Important: open
Options -> Databasetab ->Database Configuration. From theDatabasedrop-down list, selectsoftactivity1, which is the database name you restored the dump into. ClickCheck Connection. ClickOKto save the new settings.
- Not needed for TS Monitor: restore the Agents list that you backed up earlier. Click
File -> Import Agents list, and select youragents.xmlfile saved earlier in theDocumentsfolder. Delete theagents.xmlfile afterward because it may contain passwords. - Click
View Reportsand log in to your on-premises SoftActivity Web Console. Ensure that you can log in with your previous account credentials. Verify that your user list is present on the right side of the console, and confirm that you can view logs and screenshots as expected.