How to install SoftActivity Monitor Client App: Admin Guide
SoftActivity Monitor Client App, also called Agent, records user activity on monitored Windows computers and sends the data over an encrypted connection to your SoftActivity Monitor server for storage. This guide is primarily for Local network deployments where the Monitor server can reach the target computers directly over the office network or VPN.
If you need to monitor off-premise or cloud-managed computers where the Monitor server cannot connect directly to each client, use the dedicated External Agent guide instead.
Table of contents
- Overview
- Respecting user privacy
- Choose the right deployment path
- Requirements for Local network mode
- Install Client App remotely from SoftActivity Monitor
- Install Client App locally
- Silent installation from command line
- Remote and managed deployment methods
- Visible and Stealth modes
- Verify the computer is connected
- Update or repair the Client App
- Uninstall the Client App
- Troubleshooting
- Related guides
1. Overview
In a traditional SoftActivity Monitor deployment, the Monitor server connects to computers on the local network, or over a company VPN. In that model, Client App installation and ongoing monitoring work best when the server can discover and reach the target computers directly.
This guide covers the current installation options for that Local network deployment model:
- remote installation from SoftActivity Monitor
- direct local installation with the installer UI
- silent installation from the command line
- secondary managed delivery options such as Intune and PowerShell
For External Agent mode, off-premise monitoring, enrollment tokens, and WireGuard-based connectivity, use the dedicated External Agent guide.
2. Respecting user privacy
Before installing the Client App, you must ensure that you are the owner of the remote computer or you are authorized by the owner, such as your company or organization, to perform the installation and to record user activity. You must also ensure that your organization has a legal basis to monitor users in your jurisdiction (more info).
SoftActivity provides privacy-related settings for this purpose. We recommend that your organization notifies employees about productivity monitoring and obtains user consent where required. Your Computer User Policy should clearly explain what information is collected, how it is used, where it is stored, and who can access it.
For SoftActivity monitoring and privacy settings, see All Agents group Properties -> Privacy tab.
3. Choose the right deployment path
Use this guide when:
- the Monitor server can reach the target computers directly over the LAN or VPN
- you want to use classic remote installation from SoftActivity Monitor in an Active Directory environment
- you are installing on company-owned Windows computers in a reachable local-network environment
Use the External Agent guide when:
- the computers are off-premise or not reliably reachable from the server
- you are deploying to cloud-managed Microsoft 365 / Entra devices without a traditional LAN-style server-to-client connection path
- you need enrollment tokens and External Agent mode
Important: the built-in Install Agent flow in SoftActivity Monitor is for Local network deployments. Do not use this article for External Agent enrollment steps.
4. Requirements for Local network mode
Before using the steps in this guide, make sure the following are true:
- SoftActivity Monitor is installed and running on the server or administrator PC.
- SoftActivity Monitor is in
Server Mode. - The target computers are company-owned Windows computers.
- The Monitor server can reach the target computers directly over the local network or VPN.
- For remote installation, you have Domain Admin or similar administrative rights on the target computers.
- Client App and Monitor should be kept on the same product version.
- Local firewalls, antivirus, and endpoint security products must allow installation and runtime communication.
If these conditions are not met, especially if the server cannot reach the client directly, use the External Agent guide instead.
5. Install Client App remotely from SoftActivity Monitor
This is the primary method for classic Local network deployments. It is best suited to domain-joined and network-reachable Windows computers on the same LAN or on a company VPN.
- Start SoftActivity Monitor on the server or administrator PC.
- Open
Options -> Generaland confirm the application is running inServer Mode. - Click
Install Agentin the Task pane on the right side. The remote installation window appears.
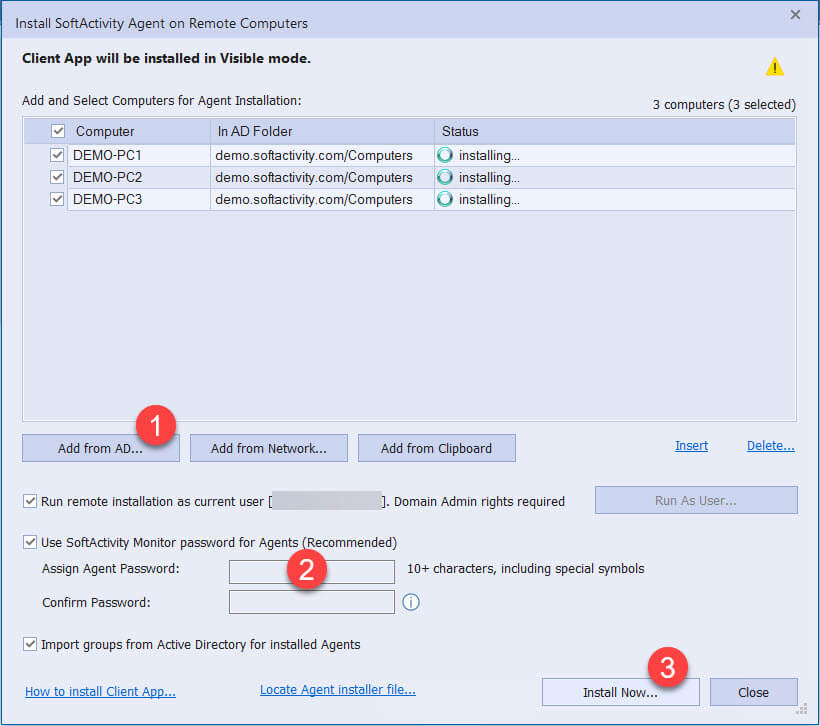
- Click
Add from AD (Active Directory)and select one or more target computers. If needed, clickAdvancedandFind Nowto display available computers. - Select whether to reuse the same password as SoftActivity Monitor or enter a new password for the Client App. If you are reinstalling on a computer that already has Client App, use the same existing password or the installation may fail.
- The installation mode follows your privacy settings in
All Agentsgroup Properties -> Privacy tab. Client App will be installed inVisiblemode if visible mode is enabled there, or inStealthmode if visible mode is disabled there. - Click
Install Now. - Wait for the status of each target computer to show success.
- If a computer fails, review the error shown for that computer, fix the issue, and rerun the installation.
If the server cannot reach the computer directly, do not keep retrying this local-network flow. Switch to the External Agent guide instead.
6. Install Client App locally
Use direct local installation when remote installation is not practical, or when you are working on a reachable local-network computer manually.
- In SoftActivity Monitor, click
Install Agent. - Click
Locate Agent installer file. - Copy
amagent.exefromC:\Program Files\SoftActivity\Activity Monitor\Agent\to a shared folder, USB drive, or another delivery method. - On the target computer, log in as a local administrator or connect using your remote support tool.
- Run
amagent.exe. - Select
VisibleorStealthmode according to your company policy.
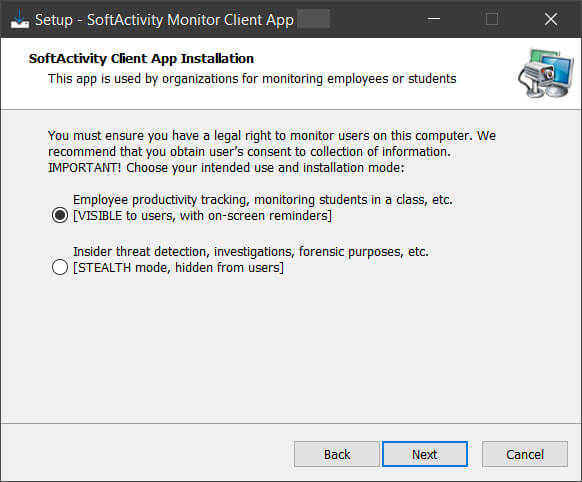
- Enter a new Client App password. You will need this password later to monitor, reinstall, or uninstall the client.
- Complete the installation and wait for setup to finish.
- Return to SoftActivity Monitor and click
Search Network for new Agents. - If the computer is not found automatically, click
Addand enter its DNS host name.
7. Silent installation from command line
Silent installation is useful for scripted deployment in local-network environments, such as software delivery tools, domain logon scripts, or other managed rollout methods.
Supported parameters:
/VERYSILENT /SUPPRESSMSGBOXES /NOCLOSEAPPLICATIONS– install without showing the normal UI/SP-– skip the initial setup prompt/OldPsw=xxx– previous Agent password, required for reinstalling an existing Agent/NewPsw=xxx– password to set for this Agent, required for future monitoring, reinstall, or uninstall/etoken="TOKEN"– enrollment token forExternal Agentmode./DIR="x:\dirname"– optional custom install directory, not recommended in normal deployments/NORESTART– do not reboot even if setup requests it/log=log.txt– write an installation log tolog.txt
Example:
amagent.exe /VERYSILENT /SP- /NORESTART /SUPPRESSMSGBOXES /NOCLOSEAPPLICATIONS /NewPsw=my098password
For External Agent mode, enrollment tokens, or /etoken, use the dedicated External Agent guide instead of extending this local-network example.
8. Remote and managed deployment methods
These methods can still be useful, but they are secondary to the main local-network install methods above.
8.1 Microsoft Intune
Intune can deliver the Client App installer to company-owned Windows devices as a managed software deployment method.
Use Intune here when:
- the computers are still expected to operate in
Local networkmode - the Monitor server will still be able to reach the installed computers directly over LAN or VPN
- you want to use the same managed deployment process for
External Agentmode, but add/etokento the installer command line for those computers
Read our Intune guide: How to install SoftActivity Monitor Client App using Microsoft Intune
If your Intune rollout is for External Agent mode, the delivery method is still the same Intune process. The difference is that the installer command line must include /etoken, and the enrollment token, endpoint, and troubleshooting details are covered in the External Agent guide.
8.2 Remote installation using PowerShell
PowerShell is a secondary scripted option for reachable local-network computers.
- Log in to the server or administrator computer as a user with administrative rights on the target computer.
- In SoftActivity Monitor, click
Install Agentand thenLocate Agent installer file. - If your installation package includes
install-agent-remotely.ps1, open that script in a text editor. - Replace
COMPUTER_NAMEwith the DNS host name of the target computer. - Replace the default password in the script with your actual Client App password, 10 characters or longer.
- Make sure PowerShell remoting is enabled on the target computer. If needed, run:
Enable-PSRemoting
winrm quickconfig
- Run the script.
- Return to SoftActivity Monitor and use
Search Network for new Agentsto find the installed computer.
9. Visible and Stealth modes
SoftActivity Client App can be installed in either Visible or Stealth mode. The mode can be selected during local installation, and administrators can also manage it remotely in All Agents group Properties -> Privacy tab.
9.1 Visible mode
In Visible mode, users are notified about monitoring of their work computer. They will see an icon in the notification area and a notification when they log in.
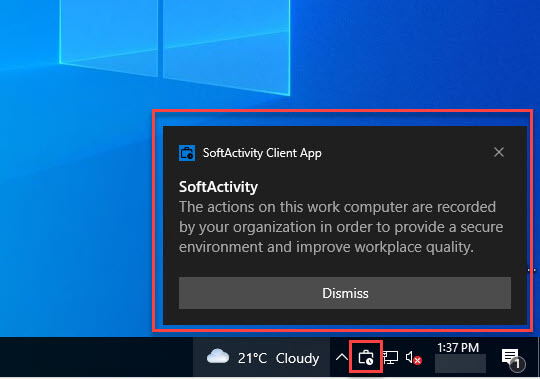
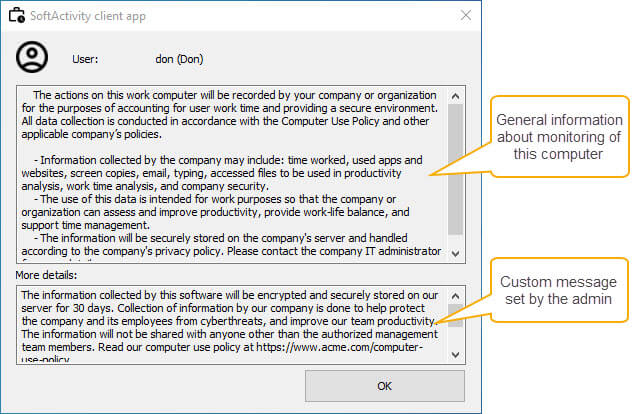
When a user clicks the notification, they can see an explanation of what information is being collected, what it is used for, where it is stored, and how it is handled.
Administrators can add a custom visible-mode message for their company’s policy. To set it, select the computers in SoftActivity Monitor, right-click, and click Set Visible mode Message.
9.2 Stealth mode
In Stealth mode, the Client App runs silently in the background and does not show windows, notifications, or icons to the user.
Use this mode only if your company policy and legal requirements allow it. Stealth mode is only intended for company-owned computers. In the demo version, stealth mode is not available.
10. Verify the computer is connected
After installation, confirm that the computer is visible and online in SoftActivity Monitor.
Check the following:
- the computer appears in the Agents list
- it can be found through
Search Network for new Agentsif it is on a local subnet, or by adding its FQDN host name in its Properties - its monitoring window opens, and live data, logs, or screenshots begin to arrive
11. Update or repair the Client App
Client App should be kept on the same version as the SoftActivity Monitor server.
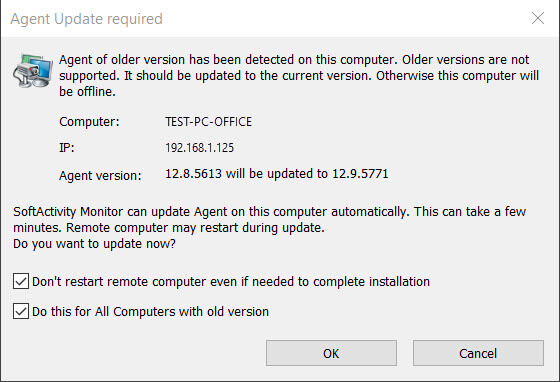
To update from SoftActivity Monitor:
- Start the updated SoftActivity Monitor server.
- Look for computers marked with
*in the list. This marker means SoftActivity Monitor detected that the Client App on that computer is older than the current Monitor version and should be updated. - Open one of those computers and let Monitor offer the update.
- Select the option to do this for all computers.
- Consider selecting the option not to restart remote computers automatically.
Other supported update paths:
- run local installation again on top of the existing Client App
- repeat remote installation from Monitor
- use the context-menu command
Update/Repair Agent Applicationin the list to repair missing files on an existing client by re-running the installation
12. Uninstall the Client App
12.1 Uninstall remotely
- Start SoftActivity Monitor on the administrator PC or server.
- Select the online computer in the Agents list.
- Right-click it and click
Uninstall Agent. - After uninstall, the computer will go offline and can be removed from the list.
12.2 Uninstall locally
- Log in to the target computer as an administrator, or connect with your remote support tool.
- If the client is in
Visiblemode, openApps & Features, find SoftActivity Monitor Client App, and clickUninstall. - If the client is in
Stealthmode, pressWin+R, runagentcmd /uninstall, and confirm the uninstall. - Wait for the program files to be removed. A restart may be required in some cases.
13. Troubleshooting
13.1 Computer is offline or missing in admin console
Read: Computer is offline or missing in admin console, cannot connect to a remote agent
13.2 Antivirus blocks files in TEMP during installation
SoftActivity recommends adding the Client App directory C:\Windows\sysnchrb to antivirus exclusions to avoid service disruptions. During installation, some antivirus products may block SoftActivity DLL files in the TEMP directory and break setup.
A workaround is to redirect TMP and TEMP during installation to a directory that is already excluded.
Create sa-agent-install-with-temp.ps1 with the following contents:
# Define the custom temporary directory path that is excluded from the antivirus
$installDir = "C:\Windows\sysnchrb"

# Check if the directory exists, if not, create it
if (-not (Test-Path -Path $installDir)) {
    New-Item -ItemType Directory -Path $installDir
}

# Set the custom TMP and TEMP environment variables for this process
$env:TMP = $installDir
$env:TEMP = $installDir

# Execute our installer and wait for it to exit
Start-Process "amagent.exe" -ArgumentList "/SP-" -Wait
Notes:
- you can add other command line parameters to
ArgumentListas described in the silent installation section - copy the
.ps1file together withamagent.exeto the target computer - run the following commands in an elevated PowerShell prompt on the target computer
- if needed, first change the PowerShell execution policy to allow script execution
Set-ExecutionPolicy RemoteSigned
./sa-agent-install-with-temp.ps1
13.3 Local network mode does not fit the environment
If the Monitor server cannot reliably reach the client computers directly, this guide is no longer the right fit. Use the External Agent guide instead: How to monitor remote off-premise computers with SoftActivity Monitor External Agent mode: Admin Guide