SoftActivity Work – Installation Guide for Administrators
Contents
- Accept the Invite and Create your Account
- Install the Client App
- Adding Antivirus Exclusion
- Verifying Data Flow
- Creating Accounts for Other Managers
- Checking your Account Settings
- Uninstalling the Client App
Accept the Invite and Create your Account
After your organization’s cloud account is successfully provisioned in SoftActivity Work, you will receive an invitation email at your designated email address. Please follow these steps to set up your account:
- Open the Invitation Email:
Click on the Accept Invitation link provided in the email. - Choose Your Login Method:
You have two convenient options to create and access your account:- Continue with Microsoft:
Click the Continue with your Microsoft Account button to log in using your work or school Microsoft account.
Advantages of using this method:- Enterprise-Grade Security: Benefit from Microsoft’s enterprise-grade security and authentication protocols, as well as your corporate multi factor authentication.
- Seamless Single Sign-On (SSO): Enjoy a streamlined login experience that integrates with your organization’s existing identity management system.
- Simplified Account Management: Reduce the hassle of remembering another password by using your existing Microsoft credentials.
- Continue with Email:
Alternatively, choose to log in using your email address and create a strong password.
- Continue with Microsoft:
- Complete Account Setup:
Follow the on-screen instructions to finalize your account setup. Upon completion, you will gain primary administrator access to manage your organization’s settings and features in SoftActivity Work. - Bookmark the web console:
Once logged in, please bookmark the SoftActivity Work console page to easily access it later for viewing logs and managing your account.
Install the Client App
Choosing Client App Mode: Visible or Stealth
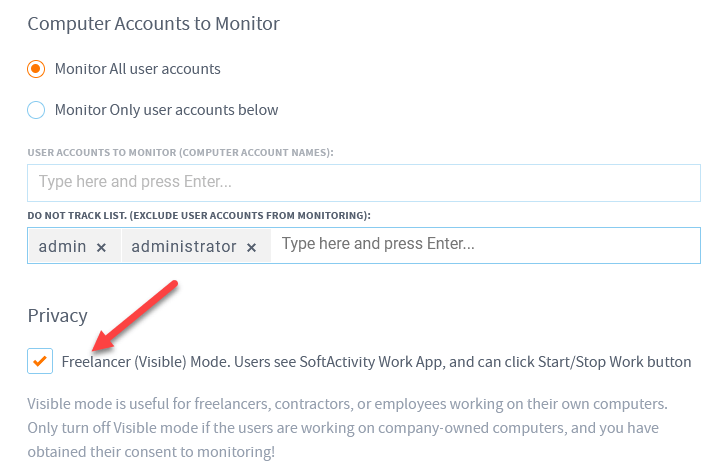
Before installing any client app you need to make sure that a correct client app mode is selected in the web console according to your company’s policy. Go to Administration – Groups, select Al Users group on the left.
Scroll down to Privacy section. Here you can choose to turn on Freelancer (Visible) Mode. By default, this option is set to OFF, indicating ‘Stealth mode’, which makes the monitoring non-visible to users.
Make sure you use a stealth mode only on the company owned computers and you have employees consent.
By carefully selecting the appropriate mode prior to installation, you can ensure compliance with company policies and legal requirements while effectively monitoring your organization’s IT environment.
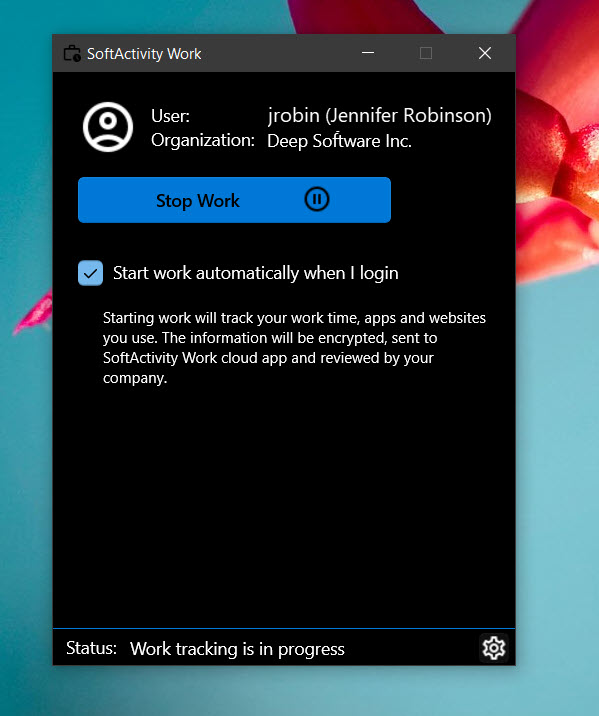
In Freelancer/Visible Mode the Client App will look as below (dark mode). Users will need to click on ‘Start Work’ to initiate the tracking of their work time and activities. For any personal activities on the computer, users can click ‘Stop Work’ at any time to pause monitoring.
In Stealth Mode, the application operates unobtrusively in the background, silently recording user activities on the company’s work computers. Users will not receive any visual indications that their actions are being monitored, making this mode suitable for discreet organizational oversight. Note that stealth monitoring should only be deployed on company-owned devices and with explicit employee consent, in compliance with legal and ethical guidelines.
Choosing Users for Monitoring
In the same ‘Privacy’ section mentioned earlier, you have additional options to customize which users should be recorded. Enter Window user names and add them to the lists accordingly. For example, some companies may want to exclude admin accounts, senior leadership accounts, etc. These should be added to ‘Do Not Track’ list.
This option should also be used to help adhere to your monitoring plan. Your plan has a fixed quota for the number of users. Choose ‘Monitor only users below’ and add users to the list up to the limit specified in your plan. Other users will not be tracked.
System requirements, supported Operating Systems
SoftActivity Work Client App supports:
- Windows Desktop.
- Windows 11, 10, 8.1. Compatible with both 64- or 32-bit edition. It will record users logging in locally or remotely via RDP, or any remote access software.
- VDI and virtual machines are supported.
- Windows Server 2022 to 2019.
- Fully compatible with Windows Terminal Services and Citrix.
- Install the Client App on terminal server to record all users sessions. It will also record local console sessions on the server. You just need to make sure you have enough users in your plan.
Monitored computers should have internet access. It’s not a problem if a computer goes offline temporarily for a few days. Logs will be recorded locally and sent to the cloud when it’s back online.
Read full system requirements.
Client App Installation
Click Download Client App button at the bottom, or go to Admin panel – Client App tab. Click Download Client App. The installation file you’ll download is digitally signed by Deep Software Inc. You can confirm this by checking the file’s properties.
The installation file is unique for your organization. Keep it safe and do not share with anyone. For security reasons, the downloaded installation file will expire in a few days. Ensure you install it promptly. You can always download a new installation file when you need to do another batch of installations.
Do not use the file on computers that do not belong to your organization, and where you are not permitted by the owner to install and monitor users. Follow to our terms of service and acceptable use policy.
Run the downloaded file to install the Client App on your company computers and/or servers you want to monitor.
The following installation methods are supported.
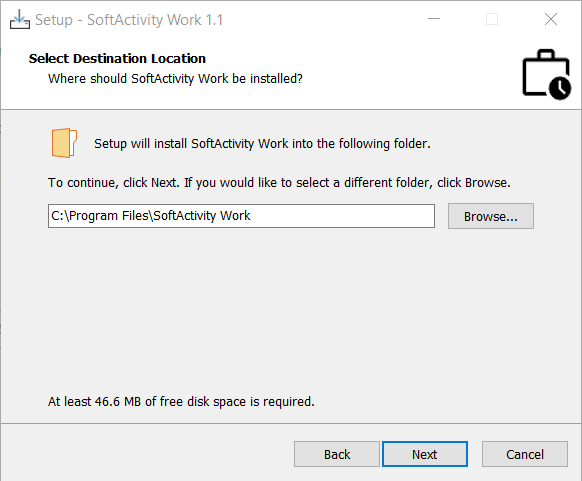
Installation with UI
Easy installation with few steps. Accept the EULA and click Next, and go through all steps.
Remote installation using Microsoft Intune
IT admins can install SoftActivity Work App on their company managed devices remotely with minimal effort using Microsoft Intune.
How to install SoftActivity Work App using Microsoft Intune
Silent deployment from command line
For low-effort deployment across multiple systems, the Client App can be silently installed using the following command-line options. If your company is not using Intune, administrators can leverage existing remote IT management tools or group policies for remote deployment.
sawork.{account}.{client_id}.exe /VERYSILENT /SUPPRESSMSGBOXES /NOCLOSEAPPLICATIONS /NORESTART /SP-other useful optional parameters:
/DIR=”x:\dirname” – override the installation directory
/log=log.txt – create installation log in log.txt file. Useful for troubleshooting the installation.
License Limitations
The client app installation file can be installed on multiple computers in your organization. Although the number of monitored users should align with the number of user licenses purchased in your plan. Make sure your plan accommodates the number of user sessions you intend to monitor.
Adding Antivirus Exclusion
To avoid potential conflicts with your antivirus software, we advise you to add the installation directory “C:\Program Files\SoftActivity Work” to your antivirus’s exclusion list. This precautionary step will help the SoftActivity Work Client App function without interruptions, as sometimes an antivirus may detect it as a monitoring software, or even have a false positive malware detection.
Verifying Data Flow
After deploying the SoftActivity Work Client Apps across your organization’s computers and servers, it’s crucial to verify that the data is being captured and reported to the cloud environment as expected. Once the data starts to populate, you should see new users and computers appearing in the web console.
- Check Reports: Select any report on the left side, such as Apps History. Make sure the list of users on the right side matches the set of users you expect to be monitored. You can also switch to Computers on the right side and check the monitored computers. Click any user and make sure there is activity data in the table.
- Review Screenshots: Navigate to Screenshots on the left side. Verify that you can see screenshots in the list. Click any screenshot to see it in full size.
- Troubleshooting: head over to Administration – Users and Computers tabs and check Last Activity Recorded. It should typically be updated within the last few minutes.
Managing User Limits
Your SoftActivity Work subscription comes with a certain limit on the number of users you can monitor, which is visible in the top right corner of the web console:
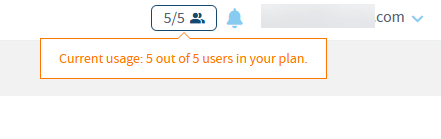
If you exceed this limit, it’s essential to promptly add the additional users to the ‘Do Not Track’ list in Admin panel – Groups – All Users group. Also delete them from Admin panel – Users. SoftActivity will remove all data for the additional users and may apply overage charges to your account.
Should you require monitoring for more users than your current plan allows, contact SoftActivity sales to upgrade your subscription.
Creating Accounts for Other Managers
Go to Admin panel – Accounts, where you can invite additional managers and co-admins into the app, so they can access the web console and view logs. Click Create an Account.
Provide the email address to which the invitation link will be sent, as well as the name of the new manager.
Select Security Role for the new account:
- Manager (Supervisor): Provides limited, read-only access to reports.; or
- Administrator: Grants full access, similar to your own account.
By default, the new users will have visibility to all monitored users. You can adjust this later based on departments, or groups.
Click Invite. An email containing a temporary secure ‘Accept Invitation’ link will be sent to the specified email address. This email gives an opportunity to the user to set up an account within your organization’s SoftActivity Work environment.
By following these steps, you can easily extend app access to additional managerial staff, ensuring that oversight and reporting responsibilities can be effectively shared.
Assigning Access Permissions
As the primary administrator of your SoftActivity Work organization, you have the ability to control which managers can see specific users. Typically, you can configure the system so that department managers are able to view only users who are part of their specific department.
Security Note: This feature is not designed to segregate access between different organizations; the data will not be physically isolated. It should used for role-based access only within a single organization!
- After successfully verifying data flow in earlier steps, you should have a populated list of users you’re monitoring. We can now create departments, also called groups and assign users. Go to Admin Panel – Groups, click Create Group and select Group Members:
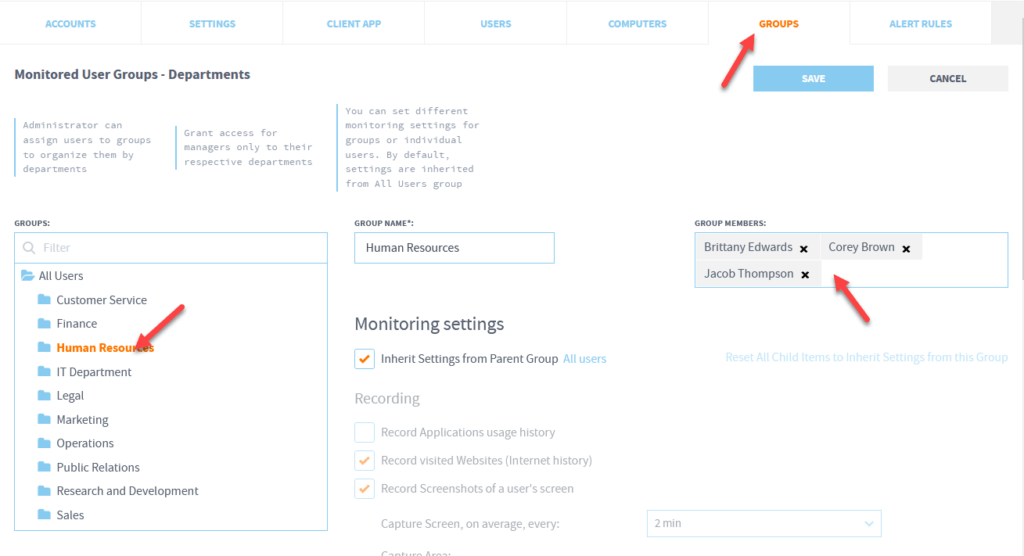
- Go to Accounts tab in Admin panel, click a manager account. Under ‘Grant the Manager access to Groups’ select one or more groups they should have access to. You also have the option here to grant the manager access to individual users. Click Save.
- Now, the manager will only be able to see and generate reports for users they have been granted access to.
Checking your Account Settings
Once you have an active account in SoftActivity Work, it’s a good idea to check and adjust your personal settings. Click your user name/email in the top right corner, click Account Settings.
- Time Zone Configuration: Confirm that ‘Use my local time zone automatically’ option is ON. This ensures that you avoid time discrepancies when monitoring computers that may be in different time zones. Alternatively, you can manually select the time zone where you are currently located from the dropdown menu. All time values in the web console will be shown in this time zone for you.
- Email Report Preferences: Go to Email Reports tab and turn on Daily, Weekly and Monthly reports. Our customers find it useful to have these reports automatically sent to their email, making it convenient to view them on mobile devices.
Uninstalling the Client App
To permanently stop recording users on a given computer or server, you will need to uninstall the client app. There are several ways to uninstall you can choose from.
Remotely from the web console
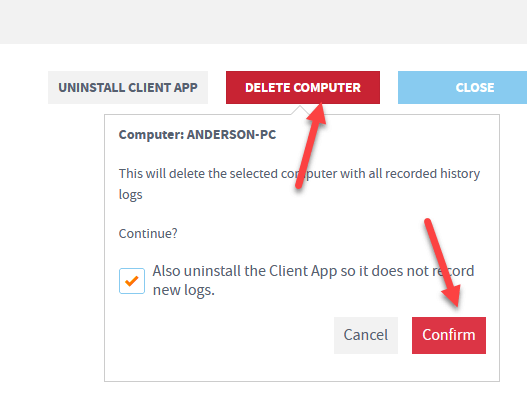
Go to Administration – Computers. Click a computer name. Click Delete Computer, select ‘Also uninstall the Client app’ check box. This will delete the computer from the system, with all it recorded users activity, and uninstall the app, so that no further logs can be recorded.
Uninstall locally from a computer
Login to Windows as a user with admin level permissions. From there you have several alternative options for uninstalling:
- Go to Apps and Features in Windows (formerly Control Panel – Uninstall a Program). Look for the SoftActivity Work Client App to proceed with the uninstallation. Note that if Stealth Mode is activated, the app may not appear in the list of installed programs.
- Press Win+R, and type this command:
saworkcmd /uninstall
It should ask if you want to uninstall. Click Yes. - Navigate the program’s folder “C:\Program Files\SoftActivity Work” and run unins000.exe