SoftActivity™ TS Monitor – Installation Guide for Administrators
Contents
- Supported Operating Systems
- Components
- Monitoring one RDS server
- Monitoring RDS farm
- Webapp Administration
- Allowing connection to PostgreSQL server from remote computers
- Updating the application
- Troubleshooting
- Appendix: Resetting password in PostgreSQL database server
- Appendix: Tuning PostgreSQL performance
Supported Operating Systems
SoftActivity TS Monitor for recording users and SoftActivity Webapp Server: Windows Server from the latest version to 2008 R2. 64- bit editions. Citrix XenApp is supported. Domain joined and Workgroup servers are supported.
PostgreSQL Server. Version included in SoftActivity installer: Windows Server 2008 or newer, 32- or 64-bit. Downloaded from https://www.postgresql.org/ : BSD, Linux, Windows, Solaris, Mac OS X
More details and up-to-date information visit System Requirements section
Components
Architecture of SoftActivity TS Monitor system consist of the components listed below. Each of them can be installed on premise, either on one server machine or on separate servers for the best performance. This allows monitoring users in a range of possible deployments from just one terminal server to a large server farm.
- TS Monitor client – recording users’ activity in server sessions. Install on all Terminal servers or Citrix XenApp servers where user sessions are running. Client sends recorded logs to a PostgreSQL database and sends screenshots as jpg files to a central folder on a file server (or on the local terminal server, in the simplest case with just one server). TS Monitor includes a configuration program for administrators to modify all recording settings and select users for monitoring. Supports Windows Server x64-bit from the latest version to 2008 R2. TS Monitor requires a license for each server;
- SoftActivity Webapp Server – web console for viewing logs and screenshots by administrators and managers. It’s running a web server, accepting connections from web browsers on port 8081, by default. Can be installed on Window or Linux. Install either on a dedicated application server, or a machine shared with the PostgreSQL database server, or in the simplest case, on the terminal server. The Webapp Server does not require purchasing of extra license and is included with SoftActivity TS Monitor license for free;
- PostgreSQL Server (https://www.postgresql.org/) – free, high performance and scalable database server. Used for storing logs recorded by TS Monitor on terminal servers. PostgreSQL can be installed on Windows or Linux, either on a dedicated server machine, a cluster of servers, or sharing a machine with any of the above components. Can be installed on Windows Server by SoftActivity installer, which will also create a default database. Optionally you can download PostgreSQL from its official website and install it separately. Currently SoftActivity supports PostgreSQL versions from 9.6 to the latest;
To update this product, please download and run the installer of the latest version. It will update installed components to the latest version. More details in Updating
To add or remove components on your server, uninstall SoftActivity TS Monitor package completely, then run the installation again and select required components. Adding/removing of individual components on a server is not currently supported.
View TS Monitor deployment architecture
Monitoring one RDS server
The easiest case of installation is with just one terminal server that needs to be monitored. In this case, all components of SoftActivity TS Monitor can be installed on the same server:
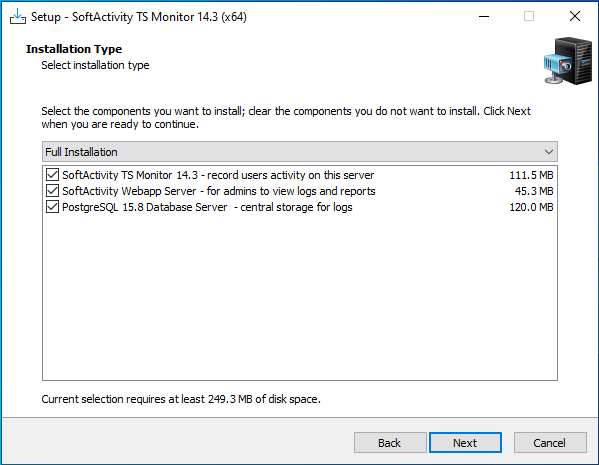
- Run SoftActivity TS Monitor installer, and select Full Installation (with all components selected):

- You can leave all options in the installer as set default;
- Click SoftActivity Webapp icon on the Desktop to view recorded logs in browser. To view logs remotely from your PC, open your browser and enter address: http://SERVER-NAME:8081
- Click SoftActivity TS Monitor icon on the Desktop (or press Win+R and type: opentsm) to change settings: select users to monitor, types of events to record, port number for the webapp server, etc.
Monitoring RDS servers farm
In case of an RDS farm, user sessions we want to monitor can be running on any server in a farm. Logs and screenshots from all serves will be combined and kept in the Central Storage on premise, from where an administrator (and managers) can view them altogether in a centralized web browser. TS Monitor component should be installed on each terminal server in a farm to record activity and send it to the Central Storage. Webapp and PostgreSQL components should be installed just once on the application server. Follow these steps:
- Choose a server machine to function as an Application Server (DOMAIN\APPSERVER, in this example). It can be either one of the terminal servers in a farm or, preferably, a separate machine or VM with Windows Server OS.
NOTE: PostgreSQL server is included in SoftActivity installation package. Optionally, PostgreSQL can be installed by the admin on Unix-style or Windows operating systems with an installation package downloaded from https://www.postgresql.org/. In this case, do not install it with the SoftActivity installer in the next step. Or you can use your existing instance of PostgreSQL engine for the SoftActivity database. Just create a new user and a database in postgres for SoftActivity services. - Create a Group Managed Service Account (gMSA) for SoftActivity services. Detailed steps in Microsoft docs
- The gMSA account name we create for this example will be:
DOMAIN\SoftActMSA$ - Create the Key Distribution Services KDS Root Key, run this in Powershell on AD domain controller as Domain Admin:
Add-KdsRootKey -EffectiveImmediately - To create the gMSA run this command (one line):
New-ADServiceAccount -Name SoftActMSA -DNSHostName softactivity.your-company.domain.com -PrincipalsAllowedToRetrieveManagedPassword "Domain Computers" - , where
PrincipalsAllowedToRetrieveManagedPassword– is the computer accounts (or the security group), that will be allowed to use this MSA. In our example, all domain computers will be able to use the accounts. It’s recommended to replace this with a group that includes only your TS Farm servers,SoftActMSA– gMSA name for our new service account. You can use any name instead,DNSHostName– Specifies the DNS host name of Service Account. Suggested value: softactivity.your_domain_host_name - You can run the following command to show all existing service accounts and ensure that new SoftActMSA has been created in your AD:
Get-ADServiceAccount -Filter *
- The gMSA account name we create for this example will be:
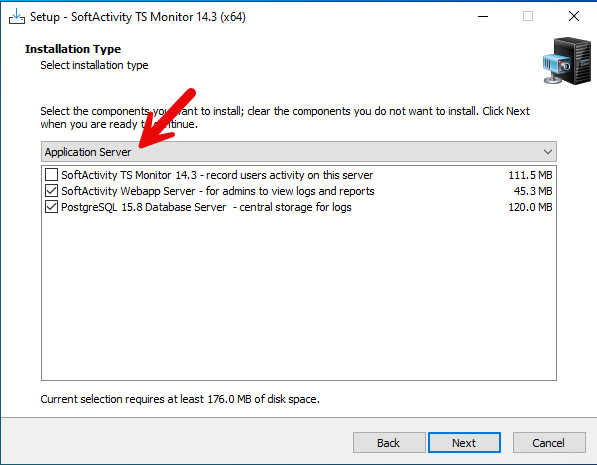
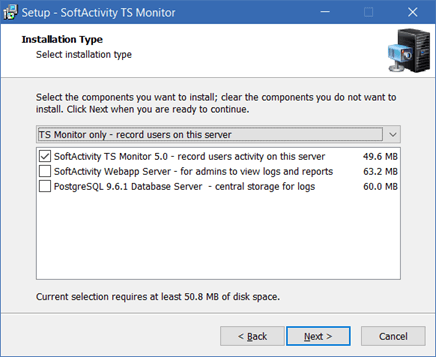
- Login as a user with Administrator rights onto DOMAIN\APPSERVER machine and run SoftActivity installer, select Application Server from the drop down, so that only Webapp Server and PostgreSQL components are selected (in case of a dedicated server; select Full Installation in case it’s shared with one of the servers in a farm). Click Next.
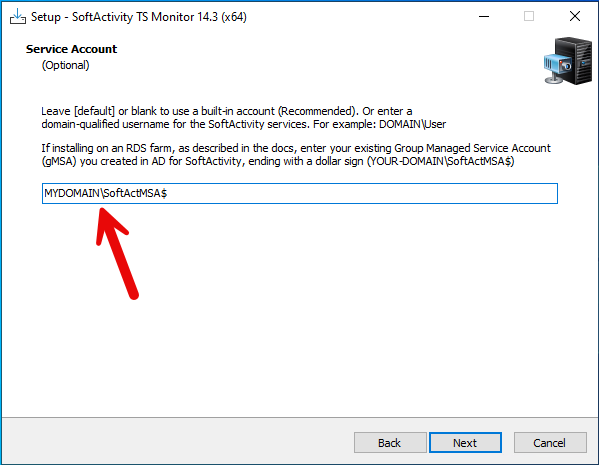
- Enter the gMSA account name
DOMAIN\SoftActMSA$created earlier into the installation window. Replace DOMAIN with your domain name.
- Enter and remember or save a new password for PostgreSQL server.
Enter the data folder path on a local drive (or leave the default directory on the system drive), where PostgreSQL database files and, separately, screenshots will be stored. Selected drive must have enough empty space for storage. At least 1 GB per monitored user is recommended. Selected directory must either be empty, or not existing (in which case it will be created during installation). In the following examples we will useE:\sa-data\ - Wait until the installation finishes. Open SoftActivity Webapp Configuration from the Desktop shortcut, Start menu or press Win+R and type: opentsm.
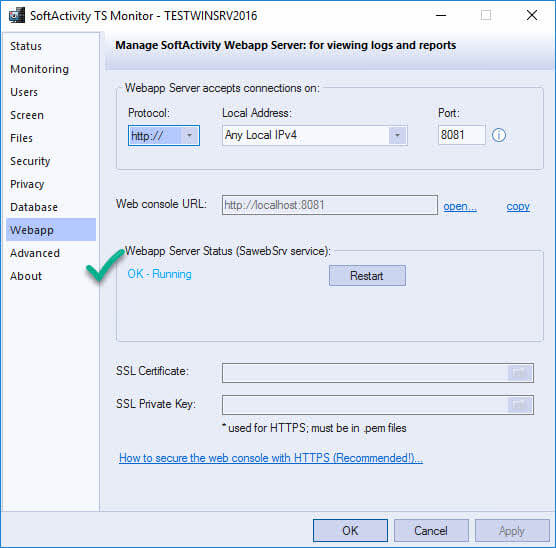
- Switch to Webapp tab and verify that Webapp server Status reads: OK – Running; click Open next to the webapp URL to check the web server’s availability in browser. Although there will be no data shown in the Webapp until we point TS Monitor on at least one terminal server to this database and screenshots folder.
- Allow connections to PostgreSQL database from the other terminal servers. It’s described below under Allowing connection to PostgreSQL server from remote computers.
- Create a network share for the Central Screenshots Folder on the application server and ensure correct NTFS permissions. Follow these steps:
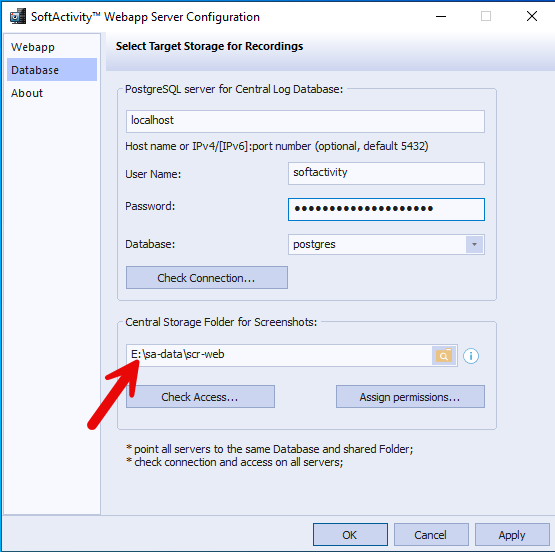
- Copy the Central Storage Folder path from the Database tab and open the folder Properties in Windows. If you, for example, selected E:\sa-data as the data folder, the central screenshots folder will be
E:\sa-data\scr-web - Make sure the regular non-admin users in your domain have NO access rights to this folder. You can check this in Effective Access in the folder’s advanced security properties.
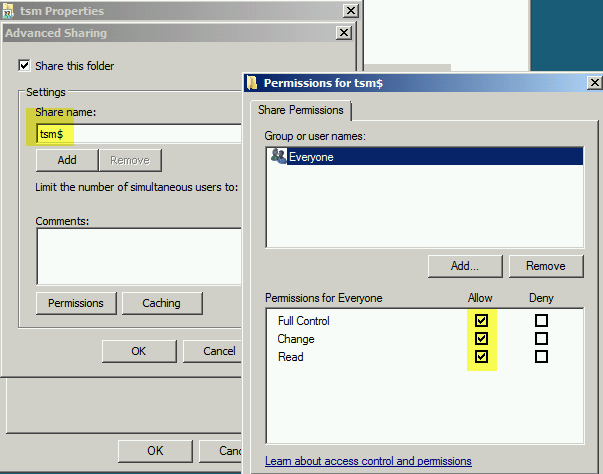
- For this tutorial, we will share this folder with tsm$ name, so that the share is invisible to casual browsers. Allow Full Control of the share to Everyone. The access rights will be limited by NTFS permissions. Only the service account created earlier and the admin user should be able to access it.
- Copy the Central Storage Folder path from the Database tab and open the folder Properties in Windows. If you, for example, selected E:\sa-data as the data folder, the central screenshots folder will be
- Now, when Application server setup is done, we need to install TS Monitor client on the terminal servers in the farm and point them to this Central Storage Folder and PostgreSQL Database. Follow instructions in the next step.
- Install TS Monitor component on the 1st terminal server in the farm, i.e. DOMAIN\TSERVER1 in this example.
- If you have a lot of servers in the farm, you can automate the installation from command line.
- You must be logged in as a user with Administrator rights in order to run the installation.
- Assign a new password for TS Monitor, which will be required to open TS Monitor configuration later.
- Users may be actively working on the terminal server in other sessions. The installation process is designed to be non-intrusive, ensuring that it neither disrupts these sessions nor alerts users to the installation of the monitoring software. Additionally, this process does not necessitate a server reboot.
- From the moment the installation finishes, TS Monitor will start recording all user sessions in a local cache database.
- Enter the gMSA account name
DOMAIN\SoftActMSA$created earlier into the installation window. Replace DOMAIN with your domain name.
- Click SoftActivity TS Monitor icon on the Desktop (or press Win+R and type: opentsm) to open SoftActivity TS Monitor Configuration, where you can change settings: select users to monitor, types of events to record, etc.
- [Optional] In case you have not selected the service account name during installation, you can assign it to SoftActivity service later from a cmd window As Admin:
- Stop the service:
sc stop SalogSrvTsm - Set account for
SalogSrvTsmservice. :
sc config SalogSrvTsm obj= "DOMAIN\SoftActMSA$" password= "" - Start the service
sc start SalogSrvTsm - Make sure that SalogSrvTsm service starts successfully
- Stop the service:
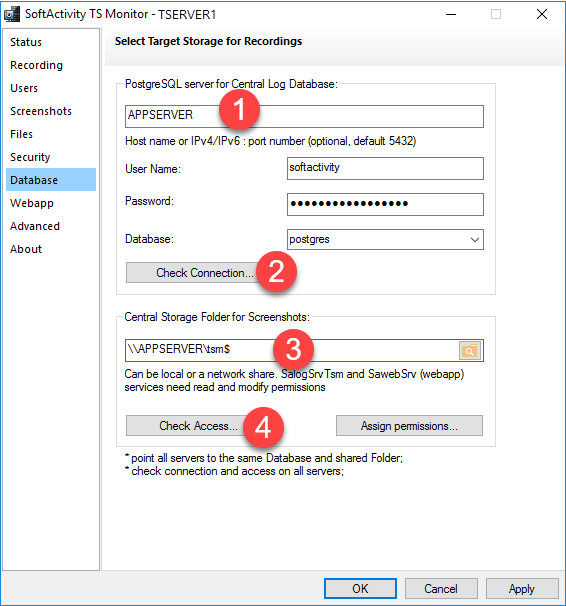
- Now we have to point TS Monitor client to the Central Database and the Central Screenshots folder (on DOMAIN\APPSERVER in this example) created in the previous steps.
- Enter PostgreSQL database host name (APPSERVER or its FQDN, such as APPSERVER.domain.company.com), connection credentials previously assigned on APPSERVER, and the database name.
- Default database user name is softactivity, the password is what you specified during the installation on APPSERVER. Click Check Connection button.
- Enter the network share’s path \\APPSERVER\tsm$ and click Check Access button. If you get any access errors, check the folder’s NTFS permissions and shared folder status. Click Apply to save the settings.
- In case Check Access shows errors, double check the earlier steps with creating the service account and network share permissions on APPSERVER.
- Login to the web console in web browser and verify that data from TSERVER1 has appeared in the webapp. You should see the server and user names in the right-side panel. New logs from each server will be updated in the webapp approx. every 2 minutes. Click Refresh to see new logs.
- Repeat steps 11-15 on other terminal servers in the farm, i.e. TSERVER2 in this example and point them to the same Central Database and Central Screenshots shared folder. Important: you must have a license for each one of the servers where you install TS Monitor component.
SoftActivity Webapp Administration
Default administrator account in the SoftActivity web console is created during installation:
User Name: sadmin
Password: {you will see the default password reminder when you click View Reports}
It is highly recommended for the administrator to change their password immediately after installation.
To change administrator password:
- open the webapp in browser at http://localhost:8081, by default (or click Open link on Webapp tab in TS Monitor Config);
- login with the above default credentials;
- click sadmin menu in the top right corner, click Edit Account
- click Password tab, and enter the new password, click Save changes
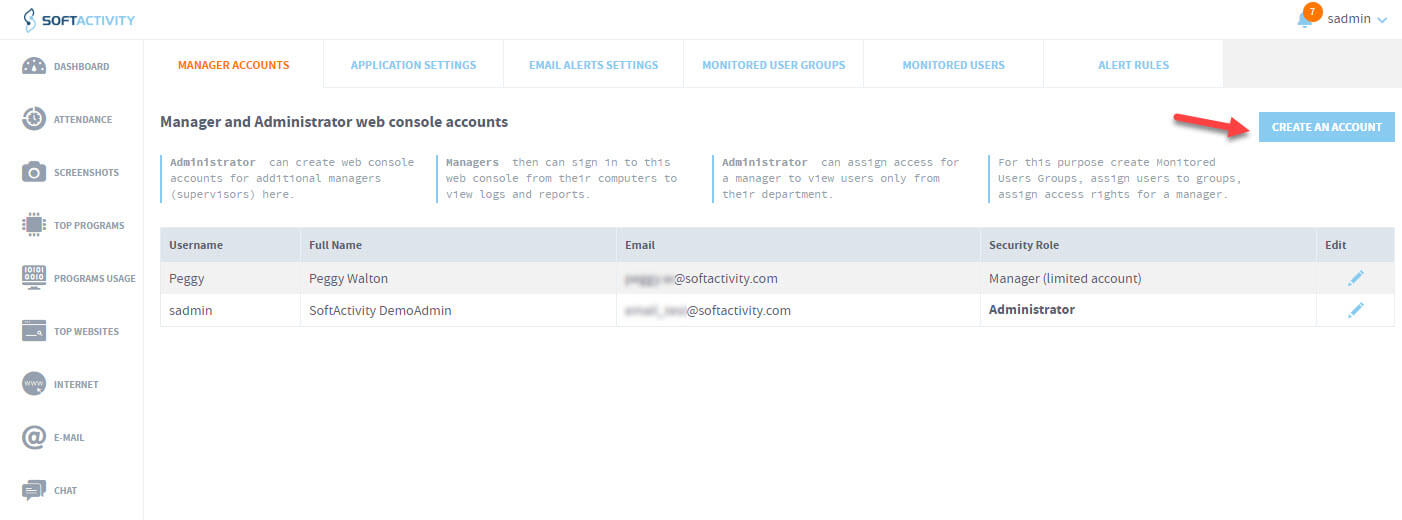
Create a new manager/supervisor account in the web console:
- Manager account is a limited account used for viewing logs and reports. Managers cannot modify any application settings.
- To create a new limited account, login as an administrator with the above default sadmin account;
- Click your user name in the top right corner, and click Admin Panel
- Click Create an Account button;
- Enter a new user name to assign to this manager’s account and their personal information below;
- Select Security Role: Manager/Supervisor
- Make sure that “Active” checkmark is ON
- Enter or generate a new one-time password for the account, at least 8 characters long;
- Supply the webapp URL, user name and along with the temporary password to the manager;
- When the manager logs in, they will be prompted to change their one-time password to a permanent one of their choice and remember it;
Enabling HTTPS for the web console
It’s recommended to access the web console via secure HTTPS protocol, even inside the company’s network. SoftActivity web console supports HTTPS connection. Follow these steps:
- Prepare a TLS certificate. You will need. pem files for the certificate and the private key. SHA-256 is recommended. You can either create a self signed certificate using openssl command line, or get it from a certificate provider. This is outside of scope of this guide.
- Example of an Openssl command line to generate a new self-signed certificate, valid for 1 year, for your web console. This command will create key.pem and cert.pem files:
openssl req -x509 -nodes -sha256 -newkey rsa:4096 -keyout key.pem -out cert.pem -days 365 - Another excellent option is a free certificate from Let’s Encrypt for your server’s FQDN. It can be obtained using
certbot CLI.
- Example of an Openssl command line to generate a new self-signed certificate, valid for 1 year, for your web console. This command will create key.pem and cert.pem files:
- Securely store the .pem files on your server with restricted NTFS permissions, so that no other users can access them. Assign read permissions to the .pem files for the service built-in user account:
NT Service\SawebSrv, or the Service Account you selected during installation (DOMAIN\SoftActMSA$). - Open Webapp server Configuration on SoftActivity Application server machine:
- Select protocol HTTPS://
- Port number can be changed to 443 (default and recommended for HTTPS) or any other number, such as 8081, for example. You will just need to access it via HTTPS:// prefix in the web browser regardless of the port number
- Select the .pem file for the certificate and the private key.
- Click Apply, click Open next to the webapp URL to check it in browser.
- If users need accessing the web console from remote computers, change the port number Windows Firewall rule called SawebSrv
- For troubleshooting click Even Log link on About tab in the Configuration window

How to convert a certificate from .pfx to .pem format files
- Export a PFX-format cert with Private Key from Manage Certificates in Windows.
- Convert the PFX cert to PEM format:
openssl pkcs12 -in filename.pfx -out cert.pem –nodes - Edit cert.pem file manually, remove any “private key” portion. Use this file for the “certificate” field in SoftActivity webapp settings
- Extract the private key. For this you will need to have a password for the pfx file.
openssl pkcs12 -in filename.pfx -nocerts -out key.pem - The Private key now must be converted to a non-password format
openssl rsa -in key.pem -out server.key - Rename server.key to server.key.pem and use this for the private key in SoftActivity web app setting
- Restart the web app service
Set data retention policy
By default, recorded logs will be retained indefinitely on the server. It’s only limited by the hard drive space available on the server. Administrator can set a retention interval for logs and screenshots. To do that:
- Log in to the web console as a user with user with Administrator rights
- Click your user name in the top right corner, click Admin Panel
- Switch to Application Settings tab
- Under Auto-Cleanup of old data, select a retention interval in days or months
- Click Save
- The system will perform a clean up of old data once per day
Setup email reports
Follow these instructions to enable periodic automatic reports by email for managers: Setup email reports and alerts in SoftActivity
Allowing connection to PostgreSQL server from remote computers
By default, for the best security, PostgreSQL server allows connections only from the local computer. To allow connections by TS Monitors and/or the Webapp server from other computers on your network you need to follow these steps:
- On the application server machine or database server machine where PostgreSQL server has been installed:
- go to the PostgreSQL data directory (by default, if installed by the SoftActivity installer, C:\ProgramData\Salog\data\pgdata); or switch to About tab in SoftActivity Webapp Configuration utility and click “PostgreSQL config files…” link to open the folder
- open pg_hba.conf in Notepad
- add a new line at the end of the file, of the following format:
host postgres softactivity 192.168.1.1/24 scram-sha-256
, where:
postgres – database name used for SoftActivity; or all to allows access to all databases on this server;
softactivity – PostgreSQL user name with write access to the above database;
192.168.1.1/24 – IP mask of remote addresses allowed to connect to this database; IP mask should match other SoftActivity servers on the network;
scram-sha-256 – authentication method; Note: it should be set to md5 if the above lines have md5 method. If a wrong method is set here, you will see a wrong password error when checking connection.
You can add multiple lines for each terminal server with an address IP, e.g. 192.168.1.2/32;
- for more details about pg_hba.conf file format read this
- open postgresql.conf in Notepad
- find the line with
listen_addresses. By default, for security reasons, it may be set to localhost which allows connections only from the local computer. Make sure it’s set to:listen_addresses= '*'
This allows Postgres to accept connection on all network interfaces, or set to ‘0.0.0.0’ – for all local IPv4 address, or ‘::’ for all IPv6 interfaces, or an actual IP address of a local network interface connected to the LAN.
Note: If needed, un-comment the line by removing the leading #. If a line starts with # character, the whole line will be ignored - open a port in Windows Firewall for PostgreSQL server. Port number is selected during installation, by default 5432. To find out the port open postgresql.conf in Notepad and look for
port =line.- open Firewall with Advanced Security in Windows;
- click new Rule; Type: Custom;
- select program: postgres.exe located in C:\Program Files\SoftActivity TS Monitor\postgres\bin, by default
- select Protocol type: TCP; Port number: <enter PostgreSQL port number (default 5432)>; Remote port: all;
- select Action: Allow. Optionally, enter a range of IP address that can access the port. Leave other settings default.
- restart SapgSrv15 service (if PostgreSQL was installed by SoftActivity installer), or “postgresql-x.x” service for standalone installation to apply new settings. To verify the firewall rule, open Resource Monitor in Windows Server – switch to Network tab, click Listening Ports at the bottom, find postgres.exe line with the port number and make sure that the Firewall Status column reads: Allowed
To check connection to the server, open SoftActivity TS Monitor on another server, go to Database tab, enter Postgres host name, port number and connection credentials, and click Test Connection button.
Updating the application
Administrator can update SoftActivity TS Monitor application to the latest version by following these easy steps:
- Click Check for Updates in TS Monitor Client on About tab. Another option is to open SoftActivity Updates Center.
- Download the installation package of the latest version.
- Run the installation package on each server where TS Monitor Client and the Webapp is installed. It should detect an older version and offer to update. Click OK.
- After installing an update, it may take a few minutes for the database update, before new logs from the servers start to arrive.
- Make sure that all servers including the Webapp are upgraded to the same version. Otherwise, logs from servers with older versions maybe not recorded in the system.
Troubleshooting
- Check in Task Manager – Service tab if the services listed below are running. Ensure they are set to Startup type: Automatic. Try restarting the services.
- On the terminal servers with TS Monitor client:
TsmSvc – recording user activity to a local cache;
SalogSrvTsm – data uploader from local cache to the central storage; - On the Application server with the webapp:
SawebSrv – webapp server, running the web server process and serving browser connections;
SapgSrv15 – PostgreSQL database server installed with SoftActivity installer;
- On the terminal servers with TS Monitor client:
- View windows Event log with the source: SalogSrvTsm, TsmSvc, SawebSrv, Postgres. Quickly access Event Viewer from a link on About tab in TS Monitor. Fix issues that might be causing the errors shown in event log and restart the service.
- Open TS Monitor- Database tab and click Check Connection, Check Access button. In case of any access errors, resolve those access issues.
- Problem: Webapp not available in browser, unable to start SawebSrv service, status: Stopped on Webapp tab; in Event Log: “error loading python35.dll” or “webapp process exited with code -1”
Fix: install the latest Windows updates on the server. In addition, download and install this Windows update manually: http://support.mcrosoft.com?kbid=2999226 - Problem: cannot start one SoftActivity services: SawebSrv, SalogSrv, SalogSrvTsm, SapgSrv15
Error message in Even Log: could not login with specified service account
Solution: Open Local Group Policy->Computer Configuration->Windows Settings->Security Settings->Local Policies->User Right Assignments. Open “Log on as a service” policy and make sure it includes NT SERVICE\ALL SERVICES group. Notice, that this policy might be overwritten by the GPO from the domain controller, when it propagates. In this case, you will need to add NT SERVICE\ALL SERVICES to the domain’s policy and propagate to the computer by running: gpupdate /force.
Try starting the problem service again and see it’s able to login. - Problem: What is my PostgreSQL database password?
Solution: In case PostgreSQL was installed with SoftActivity installer (which it does by default), PostgreSQL superuser password is the same as you’ve assigned for TS Monitor during installation. - For further help, Contact SoftActivity Support and provide the error messages found in your server’s event log;
Appendix: Resetting password in PostgreSQL database server
In case Check Connection button in TS Monitor Configuration on Database tab shows an authentication error and you cannot recall your password for PostrgeSQL database, try entering user name: softactivity and the same password as you used when installing SoftActivity TS Monitor.
If you need to reset the password for PostrgeSQL server, you can follow the steps outlined in our guide.
Appendix: Tuning PostgreSQL performance
Tuning performance of PostgreSQL server might be needed if monitoring users on multiple server with a central database. This setup may produce a considerable amount of data and cause high CPU usage (up to 100%) by postgresql.exe processes on the server machine and a slow responsiveness of SoftActivity web console.
By default, PostgreSQL is configured to use only a minimum amount of RAM. Processing larger data volumes might cause frequent table scans and less caching, which consumes a lot of CPU. Allowing Postgres to use more RAM usually helps to significantly reduce CPU pressure.
Follow these steps to dedicate more RAM and tune other settings suitable for Postgres on your particular server hardware or a VM.
We recommend to calculate the optimal config parameters based on your server hardware on this website: https://www.pgconfig.org
Select PostgreSQL version: 15
Architecture: 64 Bits
Application profile: DB and APP on the same server
Enter your number of CPU cores on the server
Enter Total Memory: amount of RAM on your server.
Below in MIXED column you will get a list of values for your postgresql.conf file.
Your postgresql.conf file can be found in this default localtion: C:\ProgramData\Salog\data\pg-data
Or just go to Options – Configure webapp server – About tab and click PostgreSQL config files link there.
Here are also some of our recommended values for RAM:
shared_buffers = 2GB #set at 25% of total system RAM on the server
work_mem = 128MB #used for in-memory sort
maintenance_work_mem = 256MB #set at 10% of available RAM, up to 1 GB
effective_cache_size = 6GB #set about 50% of total system RAM
The following two values are only recommended when multiple TS Monitors use the same Postgres database.
If they are not in .conf file, just add them:
max_locks_per_transaction = 256
max_pred_locks_per_transaction =256
- Make a backup of postgresql.conf file before editing it.
- Update the values in postgresql.conf file.
- Restart SapgSrv service to apply changes. Make sure it’s in Running state.
- In case of errors or typos in postgresql.conf the service will not start.
- To troubleshoot service startup problems look at Windows Event Log for errors from source=Postgres
- There should be details about particular configuration values that are wrong.
- Monitor CPU usage by Postgres when you open a web console.